 |
|
 Nov 30, 2006, 03:47 PM // 15:47
|
#1 |
|
Frost Gate Guardian
Join Date: Nov 2006
Location: Ascalon
Guild: Venatori Solaris
|
UW Farming [Duo] - New Approach  ============ INTRODUCTION ============ As you all know, with the release of Nightfall campaign, (UW) farming has suffered blows from A.Net. The AI has been rescripted to "running and healing then coming back" for grouped melee monsters from "bashing targets forever". Now the AI operates as follows: If there are more than 3 melee monsters attacking a target close to each other, should they take significant damage all at once (over time or at the same time), they begin scattering. To be more exact: Let's say there are 5 smite crawlers attacking the 55tank. When they have their HP's lower than %60, 2 of them seperate from the group to obey the "3 attackers" rule, waiting somewhere else for healing then coming back. This basically hinders all attempts to farm them using Spiteful Spirit, Famine or Barrage, resulting in too much time loss. This build, even if it shares the 55Hp tanking principal as usual, killing is a whole new story. To make it %100 clear, we are going to kill monsters one by one and I will explain how. ============= WHAT TO BRING ============= Characters Needed: 1-) Warrior/Monk Armor: Full Gladiator's Set (for the energy), dosen't matter what the armor level is just buy a cheap one, as for the helm use an Executioner's Helm (Axe Mastery +1) Attributes : 16 Axe Mastery (Helm +1 Superior Rune of Axe Mastery +3) 10 Strength (+3 Superior Rune of Strength) 3 Hammer Mastery (+3 Superior Rune of Hammer Mastery) 3 Swordsmanship (+3 Superior Rune of Swordsmanship) 3 Tactics (+3 Superior Rune of Tactics) 8 Protection Prayers 8 Smiting Prayers (This should leave 1 unspent attribute points) Equipment: Weapon : Any +%50 damage "while health is above %50" or "while enchanted" Axe with the following upgrades: Offensive upgrade should be one of the elemental hafts. (Water Earth Air) The reason for this is that the Aataxes ,which will be the hardest monsters to chop, take more damage from elemental attacks due to their warrior armor. (100 vs physical 80 vs elemental) The defensive upgrade should be +%20 axe grip of enchanting. Since you will be casting the most important enchantment yourself. (These equipment upgrades are not %100 necessary but they will prove to be very useful in the long run.) Offhand: The -50 hp Grim Cesta from Ascalon.  Skillbar : 1-Protective Spirit 2-Frenzy 3-Penetrating Blow 4-Penetrating Chop [Factions Skill] 5-Executioner's Strike 6-Eviscerate{E} 7-Rebirth 8-Balthazar's Spirit 2-) Mesmer/Monk Armor: Full Enchanter's Set (merely for energy boost). Your mask should be an Illusionist's Mask. (Illusion Magic +1) Attributes : 16 Illusion Magic (+3 Superior Rune of Illusion Magic +1 Illusionist's Mask) 13 Domination Magic (+3 Superior Rune of Domination Magic) 8 Healing Prayers 3 Fast Casting (+1 Minor Rune of Fast Casting) PS: Rest of the three armor pieces should be equipped with either Rune of Attunement for energy or Rune of Vitae for some extra HP which you will be lacking due to 2 superior runes. ~ This should leave you with 2 unspent attribute points. Equipment: Weapon : Any kind of one handed weapon (Sword / Axe / Spear) with a +5 energy mod. Offensive upgrade does not matter, you might as well skip putting one in it, defensive upgrade should be a +%20 grip of Enchanting. This will lenghten your visage durations from 18 seconds to roughly 21 seconds. It's not a must have, but if you can attain it, it's good to have it for comfort. Offhand: This dosen't have to have exactly the following bonuses but since this is what I'm using for this build I will write it as it is; a %20/%20 jeweled chakram (req. Illusion) will be perfect. This again will improve your potency with the visage casting. The Rockmolder green is also good.  Skillbar: 1-Essence Bond 2-Watchful Spirit 3-Mending 4-Healing Breeze 5-Empathy 6-Sympathetic Visage 7-Vengeance 8-Rebirth ----- OR ----- 2-) Monk/Mesmer Armor: Full Ascetic set (merely for energy boost). Again just buy a cheap one. Your Scalp Pattern should be Servant's Scalp Pattern (Healing Prayers +1) Attributes : 13 Healing Prayers (Scalp Pattern +1 Major Rune of Healing +2) 12 Illusion Magic 9 Divine Favor (Minor Rune of Divine Favor +1) P.S. : Rest of the three armor pieces should be equipped with Rune of Attunement (This should leave you with 5 unspent attribute points) Equipment: Weapon : Any kind of one handed weapon (Sword / Axe / Spear) with a +5 energy mod. Offensive upgrade does not matter, you might as well skip putting one in it, defensive upgrade should be a +%20 grip of Enchanting. This will lenghten your visage durations from 18 seconds to roughly 21 seconds. It's not a must have, but if you can attain it, it's good to have it for comfort. Offhand: This dosen't have to have exactly the following bonuses but since this is what I'm using for this build I will write it as it is; a %20/%20 jeweled chakram (req. Illusion) will be perfect. This again will improve your potency with the visage casting. The Rockmolder green is also good. 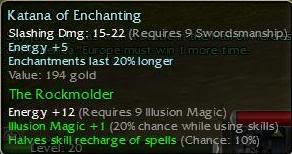 Skillbar: 1-Essence Bond 2-Watchful Spirit 3-Mending 4-Healing Breeze 5-Ancestor's Visage [Factions Skill - replacable with Echo {E}] 6-Sympathetic Visage 7-Vengeance 8-Rebirth ========================= WHERE IS THE SPELLBREAKER!?!?! ========================= From the look of things so far I can understand that you are dissatisfied but if you read up until here you will be dropping ectos amany very soon. Before getting to "where to use which skills" part I have to explain a major part of this build. THE SPELLBREAKER. As you see none of the two skillbars contain Spellbreaker or any skill of the same task. It has a simple reason. If you checked carefully, both builds can infinitely resurrect each other safely. Deaths ocurring from Nightmares or any other mistakes of any kind can be made up for with Rebirth. But when it comes to the 55hp characters' death, things take a different turn; 55 HP characters could only be resurrected with either Resurrection Signet or Vengeance. This is because of the fact that these two skills resurrect you with full health. But why die to begin with you ask. Again simple; if you think that 55 HP is invincible 20 HP is uber invincible since you will be taking 2 damage from each damage source when you get hit. This will make it possible for the support to take a nap and heal you at the same time just using Mending and Watchful Spirit. But it has a trick to it. When the 55 Warrior dies the support has to: Rebirth him first, bringing him to a safe distance from the mob that killed him. Then use Vengeance on him to Resurrect him. When arisen, the warrior must change his equipment in a fashion that he is no longer 55 HP but instead more than 150 HPs. To do that He must keep an unruned set of armor with him. Therefore replacing the Superior Runed Parts with the unruned parts will make him resurrectable with Rebirth when Vengeance ends. This goes a long way till %60 DP. The beauty of this is that lag deaths won't ruin your run anymore. Or you can practice till you grab the run, in one try. When it comes to resurrection, you are the limit now. (For those not comfortable with this intricate mumbo jumbo just use Spellbreaker instead of one of the Visages but what is the point of having infinite resurrection when you prevent death ^_^) 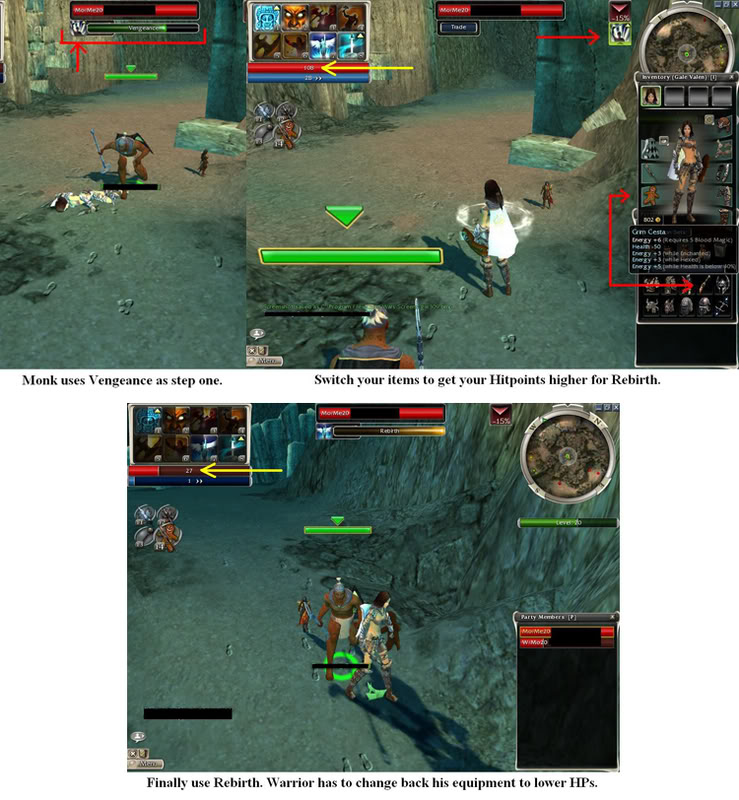 ================= MESMER or MONK??? ================= Okay now we're trying to make this build as flexible as possible. So we decided to put both versions. Some people don't have monks, yet they do have mesmers , or vice versa. The advantage of the monk is obviously his healing capabilites. Now what exactly are we talkin about here? First off, Monk's mending has a +1 health regeneration. +1 may not look juicy at all but when you are dealing with a 55hp ally, bits turn to chunks. This also goes for the bonus coming from Divine Favor. Basically when the support goes Monk, Warrior will be able to : 1- Tank more smiters 2- Won't have to wait for Healing Breeze when he gets to bleed 3- Will be more comfortable against burning. In emergencies the bonus from Divine Favor will work like a miracle when monk puts the Healing Breeze on Warrior also, fulling the Health Bar that instant. Plus the extra regeneration from Healing Breeze will make him tank more of each monster. Basically monk is safer. I suggest monk as support for those who are new to the Underworld. Now the Mesmer; now that you know the healing contrast between the two alternatives, let's talk some damage. I first want to clarify the long discussed matter: "Judge's Insight or Empathy". Simply put , Empathy deals more damage. How? Well except for Mindblade Spectres and Dead Thresher/Collectors (which we have no business with this build [yet^^]), no creature in the Underworld is undead. So the only bonus we are getting from Judge's is the AP bonus. And that simply can't compete with Empathy's huge 41 damage each time. Add in the longer casting time of Judge's and there we go, Empathy wins this. This also gives the support a more active role, so instead of getting fed up mid-run, the support can feel the damage he inputs into the mix. And that damage creates wonders. We were mainly excited about the chubby, hard-to-kill Aatxes at first and with Empathy we menaged to lower the killing estimate of 1 Aatxe from 28-30 seconds to 13-14 seconds, basically making it twice as fast. And this is versus a single Aatxe, when they come in 2 or 3, they die even faster due to higher adrenaline gain. The one problem people were complaining about the most was how slow the Aatxes went down, well now they are happy ^_^. One more thing about the Mesmer, with 16 Illusion Magic he can keep a 25 second Visage on the Warrior making it possible to drop the 2nd Visage. But to do this you MUST have to have a +%20 upgrade of Enchanting. the 5 second gap between the duration expiration and recharge is more than easy to handle. To sum it up, for a safe go, pick Monk, but for speed and damage, pick Mesmer as primary. PS: Now that we have 2 possible support chars, I'll refer the 2nd character as "support" from now on instead of Monk or Mesmer. =============== I WANT ECTOS!!! =============== Now that we have covered the details we can discuss mega monster bashing. For starters Warrior casts Balthazar's Spirit on self for unlimited energy and boosted adrenaline when taking damage. Support unloads all his permanent enchantments on warrior. The support, now has the same energy gain with warrior due to Essence Bond. We have a +6 regen 55HP warrior as you see, a true one man army. The very beginning of the Underworld is the hardest. Sometimes due to the spawns, there are 3 aataxes on the left stairs. This is good. But when there is 2 aataxes and 1 patrolling aataxe things may get ugly. We'll get to that. As the warrior takes position to attack the aataxes, The Support puts a Visage on warrior and gets out of the warrior's aggro circle immediately. This will help the warrior aggro all the aataxes, so the support will be safe. As for warrior, the moment he recieves the Visage from monk, he casts Protective Spirit and rushes into the Aataxe mob. The movement would appear basically like this : <-------- o x --------> ("o" being the warrior "x" being the support) There's huge chance for a Nightmare to pop here. Even 2. Warrior must keep his CTRL button pressed to easily observe any pops and go for the Nightmare first. He can renew his Protective Spirit at any time since he will be gaining a lot of energy from the Aataxes. The outcome might be : 1-) He killed the Nightmare and keeps holding Protective Spirit on him and tanking the Aataxes 2-) He's dead. Let's assume the worst and switch to the support. The support uses Rebirth on warrior to bring him to a safe location, does the Resurrection Trick I mentioned above. Now that the Nightmares are dead he can comfortably tank the Aataxes (unlimited Aataxes to be exact, considering his DPed Hitpoints). 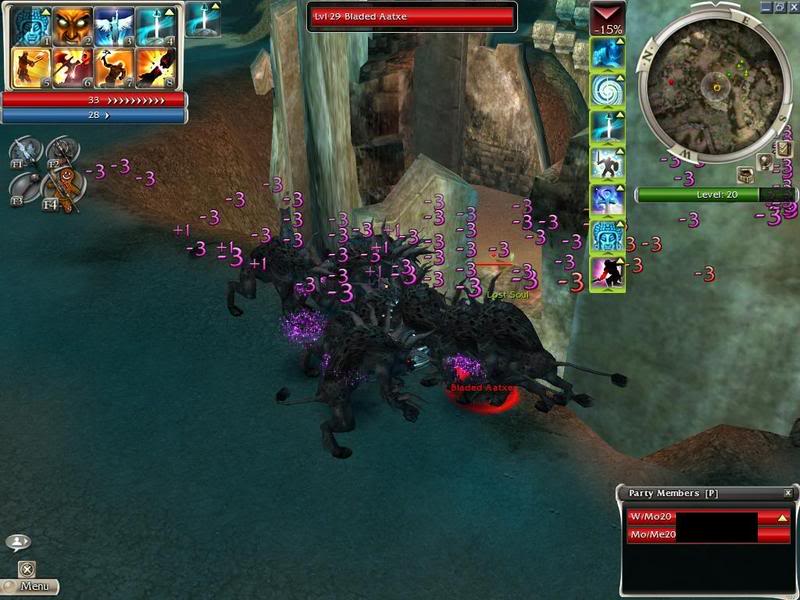 Finally the best part. Before finally attacking the Aataxes refresh your Protective Spirit for one last time to be sure. Now select one and hit Frenzy. You will notice that all your adrenaline skills will immediately unlock allowing you to perform a chain combo on the target. This is due to your fast attack speed and Balthazar's Aura adrenaline bonus. Basically you will be able to use your adrenaline skills endlessly and since you will be enchanted with Visages permanently, the Aataxes (or any other mele monsters for that matter) won't be able to use Riposte's or any sort of blocking attempts will fail due to zero energy and adrenaline. Fast killing the monsters in this build depends on DPS; when you are unloading all your adrenaline skills endlessly on targets, you will realize the damage values and how high they are. With Frenzy you will almost have 2 hits each second, each hit dealing 30 - 70 damage to an Aataxe. I won't mention the smiters since it's a real treat. As for the support I will mention how he should work with the warrior while he's hunting for mobs. DPS:  (Damage Per Second against an Aataxe is 90 average.) Should one chooses the Monk as support, it's is not a big enigma in this build. What he needs to do is time the Visages properly and resurrect his ally. But that dosen't mean there are things he shouldn't be careful about. Before each mob there is a moment of preperation. Warrior takes position to enter the mob and waits for the monk to cast Visage. He then uses Protective Spirit and rushes in. The part monk has to fulfill in this scenario is that he has to keep himself safe at all times. He should recieve no aggro. It's hard to re-organize aggro for the warrior if monsters attack different targets. So what monk should do before casting Visage is that he gets behind the warrior to spell casting distance (a.k.a. half the aggro circle distance). As soon as he puts his Visage, he must fall back and wait for warrior to take all aggro. Once all monsters are attacking the warrior the monk is free to wander around. He might as well get as close to earpicking range of the warrior and dance. Like I said he must keep track of his Visage's durations. He should make sure that either Visage is on the warrior until the other one is recharged. Other than these he must look for Nightmares in areas devoid of monsters. Nightmares pop randomly and a successful "Rend Enchantments" will only make you lose time which is essential in farming.  For Mesmer things are a bit more active. I'm not going over the "keeping yourself safe at all times" code again. Now that you have a single Visage, you must get the best out of it. 25 seconds are a lot yes but you have to be sure that the Visage is recast once it is recharge, if the gap between the recharge and expiration exceeds 5 seconds things begin to get chaotic. A Warrior fighting Aatxe's will be bleeding, which requires a Healing Breeze immediately, for smites, they'll start healing, or worse, cast a Shield of Judgement if left alone for too long. Noone wants to lose time in farming with these annoyances. So keep the visage up and running! Mesmer must also keep track of the monsters the warrior is gonna hold. If there are more than 4 the Mesmer must keep a Healing Breeze until they lose numbers. Mesmers certainly don't have to worry about energy, since they will be having plenty of that, even if they cast a Visage, Breeze and Empathy one after another. And Empathy should be used mainly against Aatxes. Smiters have huge mana pools to smite it, and die so quickly anyway. It CAN be used against Behemoth's or Dryders but oh well. That's up to you. The important thing here is that the Warrior should call his target before Mesmer uses Empathy. But as soon as it recharges, Mesmer should again put another empathy on the next Aatxe that's attacking the warrior, earning him precious seconds for when he starts attacking this next Aatxe, it'll already be in half HP. This makes things even more interesting, now Mesmer has to keep track of many things and work on multiple targets friend or foe... Even though this ain't too big a deal, adding these all up can cause loss of concentration in the long run. Just be careful and with practice you'll be okay. 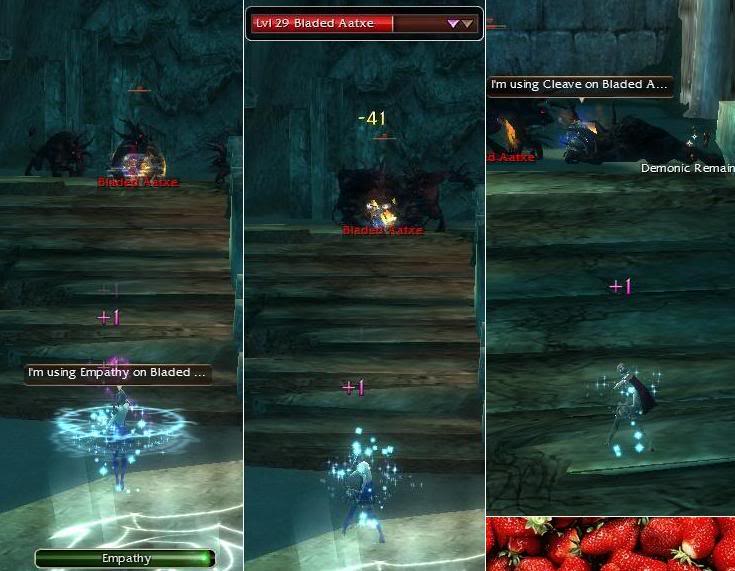 ======== ENEMIES: ======== Bladed Aataxe: Probably the most notorious of them all, Aataxes ,if you are not careful, can kill you so fast that you'll give up farming. What we know about them is that they are melee monsters, what we should be so careful about them is that they have a faster movement rate than players'. If you aggro an unwanted aataxe he will chase you and kill you. That's a fact. Remember the part where I mentioned the 2 aataxes on the left of the stairs and one patrolling? It is time to clarify that. When a warrior enters the aggro circle of the aataxes on the left of the stairs , if there is a patrolling aataxe he may get furious too and attack the warrior. Nothing is wrong about this. But this particular patrolling aataxe, should he target the support, will chase the support even if the support runs to the other side of the Underworld. Normally Aataxe mobs surrounding the first chamber in the Underworld will not chase players once they are downstairs. This particular one does though. If you are being chased you can hide behind a ghost. The Aataxe won't be able to get past that ghost. But what is the point, since you will be outside of rebirth range, you won't be able to bring your warrior back, and now that you can't kill the aataxe it's /resign time. Don't let this happen. That's why I mentioned that this part is the hardest. Once the support aggroes this particular aataxe it's game over. Other than these, the most significant thing about them is that they are durable. Being level 28 they got a lot of HPs and are the most time consuming monsters to chop in the Underworld. Empathy + Some serious Axe swinging will do though. Grasping Darkness: Not so threatening they are, make sure the support dosen't fail his Visages on the warrior since these just might interrupt Protective Spirit. When they have energy they use Distracting Blow and Fear Me, which will disturb the warrior. You should also pay attention to their movement rate. Although they don't deal much damage, the support will definitely regret having one of these on his tail. Dying Nightmare: I'm not gonna explain what this is, just know that when you see one, if you are the warrior, refresh your Protective Spirit and go for it. It does its thing in 3 whole seconds which will be plenty to get to him and land a big chop on its brains. Support should scan the areas devoid of monsters, before the warrior proceeds, to gain time (as mentioned above). Additionally we have been pulling some tricks to evade wandering Nightmares to gain time also. The trick applies to the situtations when there are Nightmares in groups of 3, with 2 more Grasping Darkness. Here's what we do : 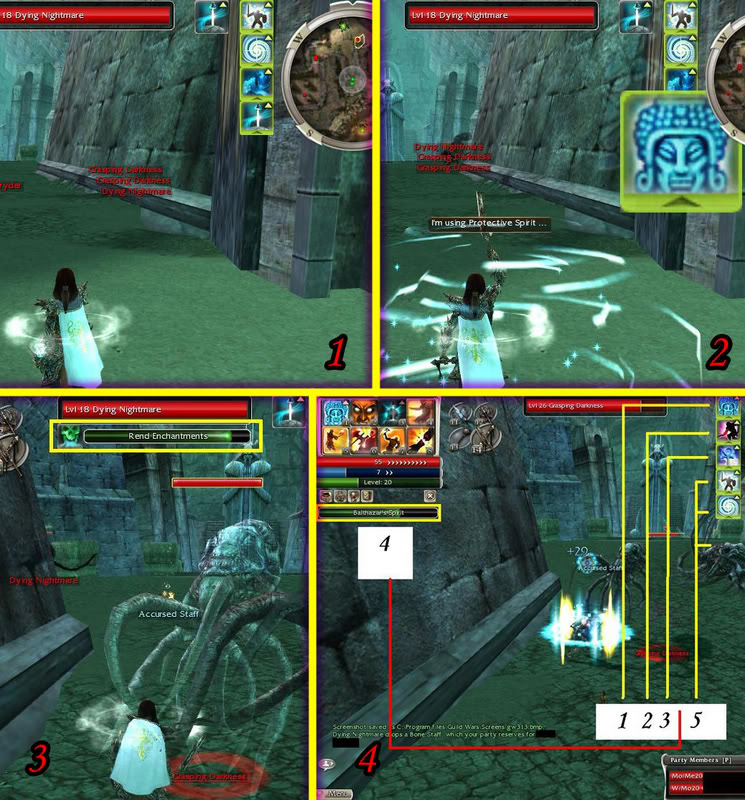 1: Spotting the Nightmare, use your CTRL button when walking into mobs to check if there's something going on. 2: Put on your Protective Spirit and wait for it to recharge. Do NOT go in without your Protective Spirit recharged. Make sure you have the Nightmare selected. 3: When you get the mob in your aggro circle Nightmare starts casting Rend Enchantments, and the Darknesses will rush you, and body block your way to the Nightmare. Now this part is crucial. In the 3 seconds of the Nightmare's cast, the Darknesses come to you and use Distracting Blow, just wait until this happens, keep your eye on the Rend cast, and when it comes to the very end... 4: Let it finish casting, and renew your Protective Spirit (Step 1). This happens in half a second. Try not to choke. Just make sure that the moment you see your enchantments removed, recast Protective Spirit. Now as explained in Picture 4, the support must put the enchantments on his part in a certain order. This is very important to the energy menagement of the warrior. He first puts Healing Breeze (Step 2) to save warrior. Then a Visage to allow the Warrior to cast Balthazar's Spirit. (Step 3) B.Spirit is very important due to the fact that the Warrior will have problems renewing P.Spirit if he has no energy income via enemy attacks. (The support may use Visage first, instead of Breeze as well, dosen't really matter). So Warrior puts on his Balthazar's Spirit (Step 4), he should keep an eye for his fading Prot Spirit and renew it once it blinks. Warrior must definitely not use Frenzy here, for again, it'll cause energy problems. While warrior's at that, support should place the remaining enchantments on the warrior (Essence Bond, Mending, Watchful Spirit as Step 5). Smite Crawler: (Yummy) These are the main target for Globs of Ectoplasm. They are extremely soft targets and take lots and lots of damage. Nothing particularly interesting about these. Just make sure that you wait a few seconds before starting bashing them since they have a huge mana pool and they may cast an annoying Shield of Judgement before going down, which will make you lose time. One other thing, if the warrior happens to die while fighting smiters, the support should kite back to a safe distance and lose tail. They have the same movement rate as the player and they will stop chasing after time.  Coldfire Night: Another notorious habitant of the Underworld, these are usually feared for their Maelstrom skill. Most of the players will hesitate to take them on probably but they are actually easy. Supports don't have to cast the Visages on warrior this time since these are not melee monsters. This allows the support to stay at a safe distance away from all the aggro circles including the warrior's. What warrior should do: The moment he observes a Maelstrom being cast he should refresh his Protective Spirit and stay under the Maelstrom since the spirit will outlast it. This will give him a lot of energy for another Prot Spirit, for in case he sees another Maelstrom coming. You can actually cast Protective Spirit even when you are hit by the Maelstrom. Maelstrom interrupts all spells each second. Protective Spirit's casting time is only 0.25 (1/4) seconds. You can therotically cast 3 Spirits while being hit by Maelstrom. This shouldn't encourage you to do so though. There's always a chance for being interrupted. Feel free to die still. Dead or not you profit from it. Lastly Coldfire's Ward Against Harm will render them resistant to damage (I recommend you not to equip fiery axe hafts) but it's no big deal. They will go down swiftly enough just the same.  Obsidian Behemoth [Optional]: This is a part that you don't have to try to pull off. But if you want to get the best of this build why not have a go at it? Obsidian Behemoths are somewhat hard to take down. This is mainly because they have skills that can easily counter melee attackers. Skills such as Throw Dirt, Whirling Defence, and many traps including Healing Spring will give you a hard time. So to kill these first get a good position behind an obstructed corner. 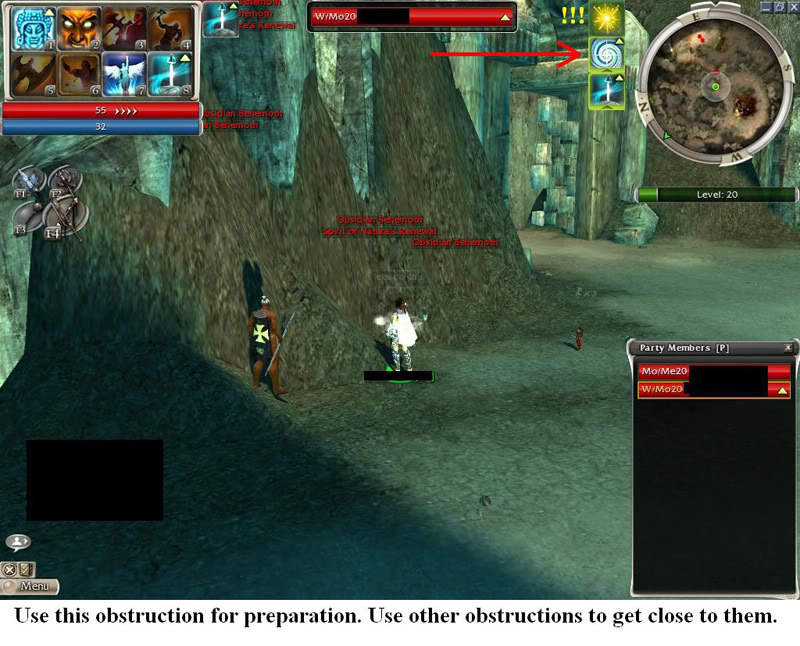 Due to Nature's Renewal, you won't be able to keep up as many enchantments as before. The support casts only Mending on Warrior now. This will leave him with +2 energy regeneration. Plenty to keep Healing Breeze on Warrior. Now Warrior having 2 pips of energy regeneration does NOT cast Balthazar's Spirit because he won't be able to absorb enough energy to keep a Protective Spirit on him. Instead the Warrior has to quit using Frenzy for a while, and use his energy regeneration solely for Protective Spirit. Now by the time you approach the Behemoths they will have laid tons of traps around them so this is what you must do: Warrior uses Prot. Spirit, Support casts a Healing Breeze on him, Warrior moves into trap range, immediately runs back, triggering all the traps but taking only minor damage from them (maybe even none). Support must keep Healing Breeze up at all times (due to the degeneration from Burning + Bleeding). Once the traps are triggered, Warrior recasts Protective Spirit and moves in for the first Behemoth. He will get blinded and blocked but in the end the Behemoths will run out of energy and you will be able to chop them. Don't bother using Visages since these are ranged monsters. Rinse and repeat this process with every Behemoth. Mesmers, use empathy only if they are attacking. They have a strange pattern so make sure they are going to attack for a while before casting Empathy, to menage your energy well. It will get harder as you ascend on that path but it's fun being able to get it done.  ( Behemoth handling is a job of patience so if you haven't noticed already, behemoths won't attack you unless they are disturbed by you. You can walk past them and they will only keep laying traps. This way you can move a long distance, but without killing there is no reward. Just so you know, you can reach the Chaos Plains only by killing the Charged Blackness on the way and the first batch of behemoths. ) Charged Blackness [Optional]: These lightning monsters will disturb you, rather than hurt you. They don't really endanger your life but they just may kill you with a little luck. Their biggest trick is knockdowns. They use Shock over and over, which may interrupt your Protective Spirit renewal even though it is very unlikely. They got Whirlwind for when you attack them and a Glimmering Mark which will postpone their doom for a while. Still even with all these skills it can be considered a breeze to kill them. Just don't forget to put on your Balthazar's Aura before confronting these and don't bother with Visages since they ain't melee either.  Terrorweb Dryders [Optional]: Dryders are to be feared for their constant burning ability. They will play dirty by casting Mark of Rodgort in the beginning of the battle and unload all the fiery damage you can imagine on their target. They are certainly not invincible but they will annoy you nonetheless. First of all you should know that these monsters (with the latest update) kite the melee attackers (Kite: Running away and keeping the player busy to both replenish mana and create easy opportunity for others to attack). So DON'T go chasing after them, why? Because they will immediately change target to support and incinerate him. What you should do may need a little practice but hey, you've got infinite resurrection so here it is : Warrior casts Protective Spirit and moves in, not to hit them, only to stand in their casting range. The support constantly (this can't fail) keeps Healing Breeze on Warrior for Burning. Dryders will start casting Meteor Shower after some minor fire spells. Warrior must renew his protective spirit and dodge the showers. After about a minute you will notice that these beasts can only cast either Immolate or Fireball which are both cheap and quick recharging spells. This behaviour should give you the hint that they are out of Energy. Now slowly but surely, move into one of the Dryders and start hitting. You'll notice that the Dryder dosen't kite. The support must cast Healing Breeze over and over and move a little farther away from Warrior just to keep himself safe. The not-kiting Dryders will soon fall, making it available for you to get quests and quest rewards. 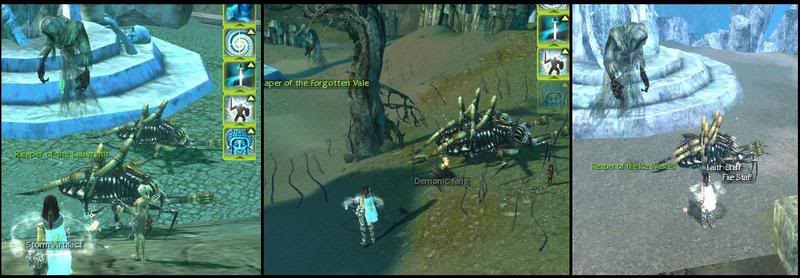 Stalker Nights [Optional]: The smaller sized companions of the Coldfires, these bossy little monsters will delay your massacre. They got a nasty 16+earth magic Ward Against Melee, which they love casting as soon as it recharges. Try and lure them out of the Ward while the Monk/Mesmer plays catch with his minipet 2 aggro circles away from you. Once out, take care of them limb by limb. ============================ FREQUENTLY ASKED QUESTIONS ============================ Q: Does this actually work? A: It does. If you observe the things I mentioned above carefully, everything including every detail is harmonious with each other resulting in a successful build. It has also been tested. Q: Killing each monster one by one is silly. Can't I go SS or Famine instead? A: I can't stop you to try it. But you will immediately see that killing one by one is the only method that keeps mobs together. And its very important because once they seperate They will change targets and attack those who should be away from harm's way, which is likely to ruin your attempts. Q: Is this fast? Is it faster than SS/55? A: This is faster than the Post-Nerf 55/SV AV and Famine. After the last update Famine and SS make large groups spread, which costs them a lot of time. It takes about 45 minutes to completely clean the Ice Wastes depending on your experience. It's slower than the pre-update SS/55 and Famine but certainly close if you choose the Empathy Mesmer as support. Killing all Aatxes and Smiters take about 30 mins if you are experienced and if you are using the Empathy Mesmer. Q: I can't resurrect the 55hp Warrior with Rebirth. He keeps dying again and again. Why? A: The process should be as follows: Rebirth warrior -> Vengeance warrior -> Warrior changes equipment so that he's not under 100 HPs anymore -> Warrior dies again -> Rebirth Warrior -> Warrior re equips armor so that he's under 55hp but not under 20HP. Q: How much DP can this build endure? How many times can I die? A: It can suffer max DP (%60) and still work. You can die as many times as you want. ==== TIPS ==== For the Support: If you feel threatened in any way, run away. Even if the warrior's life is in danger without you, your life is more important than his. He has to be safe and sound to resurrect you and same goes for you to resurrect him. Make sure that he has all the aggro before he dies, so you won't be followed by monsters. Try not to drop below %50 DP. It will halve your mana making it 30 thus making it difficult to menage energy. Before running in to cast Visages, make sure warrior has all the aggro. Pay double the attention when you are facing Coldfires. Being ranged attackers they may decide to change targets and come after you. This may hurt since they have the Shard Storm skill which will slow you down. You can always use Healing Breeze on youself to keep yourself alive since you will have tons of energy. Remember that in order for you to gain energy the warrior needs to get hit, therefore never mess with his aggro menagement. For Warrior: If you see a Nightmare don't panic. Remember there is always an ally to get you up. Just attack and eliminate the Nightmare. You will have plenty of time before he actually completes the casting and it's usually a 1 hit kill. Don't worry about your Protective Spirit duration. It has an ample 18 seconds duration with the +%20 mod. Its energy cost is no problem either, since you won't be spending energy on skills other than Protective Spirit and Frenzy under normal circumstances, you can renew it about 5 times without even gaining energy via Balthazar's Aura, with 1 pip of energy regeneration. Don't be hesitant to hit Frenzy as soon as it recharges, the energy you gain always exceeds the costs of both Protective Spirit and Frenzy. Be wary though, when you are against a single monster your energy income will be at lowest, in such cases do not renew the Protective Spirit unless it blinks and warns you. Other than these occasions feel free to renew your P. Spirit whenever you are uncomfortable with its duration. Make sure you are being hit by enemies for the energy. You must use your P. Spirit before going into mobs, not after aggroing them. General: Don't try to kill Wrathful Spirits, Banished Dream Riders and Mindblade Spectres. Don't take any quests as they might unintentionally trigger some high end mobs you can't handle, unless you are sure what the outcome of the quest is. Don't act rashly. The pair should first be comfortable before engaging mobs. Observe. Observation can get you invaluable information about everything. Patrol routes, spell castintg times, spell recharge times etc. You can develop practical ways other than the things I mentioned by observation. Experience everything; as you face different monsters you will learn by trial and error, perfecting your speed and skill in the run. UW is always hard to farm, but not impossible. I want to say a few things about the farming code too. Now that they make us do quests and missions to drop quality loot from monsters while farming, me and Sapphire came up with the idea of doing UW quests. Therefore to do Clear the Chamber, we don't go to the smiters first, we hit the road for the Terrorweb Dryders instead. Get the XP reward, then head for the Ice Wastes. Well I can't prove nor not prove that it works, but since we put so much effort into it we don't wanna risk it, so I may advise you to do the quest then go for loot. ~ I also decided to pin up these statistics for they may interest you : 1 Aatxe takes 4 Frenzies to kill (up to 30-32 seconds) - If there are 3 Aatxes or more hitting you, one takes 3 Frenzies to kill (24 seconds) PS: With Mesmer as support : 1 Aatxe takes 14-15 secs to kill / Solo ones take 15-16 seconds 1 Grasping Darkness takes 1 Frenzy to kill (up to 8 seconds) 1 Smite Crawler takes 1 Frenzy to kill (up to 8 seconds) 1 Coldfire Night takes 2 Frenzies to kill (up to 15-16 seconds) Behemoths and Charged Blackness can't be calculated due to their wild counters. They may take long to kill. ================ I CAN DO BETTER! ================ It is a flexible build. There are a lot of skills you can switch for others. Spellbreaker, Rebirth, Vengeance, Penetrating Chop... You can fiddle with these and come up with a build you feel more comfortable with. (Here is an example for warrior: Instead of Eviscerate and Executioner's Strike, equip Cleave and Dismember or drop Empathy for Clumsiness) ================ CLOSING COMMENTS ================ Each run should net you an ecto, average. It depends on how much you explore. After the Ice Wastes (smiters) there is always the Forgotten Vale. There are some other melee mobs before Obsidian Behemoths also. If you go for them too you might increase your chance for another ecto. If you got time and you're looking for some Hardcore Underworld action try the Twin Serpent Mountains and increase your chance more if not for ectos, for gold drops. Here is a map for you to easily understand to what extent you can push your limits. 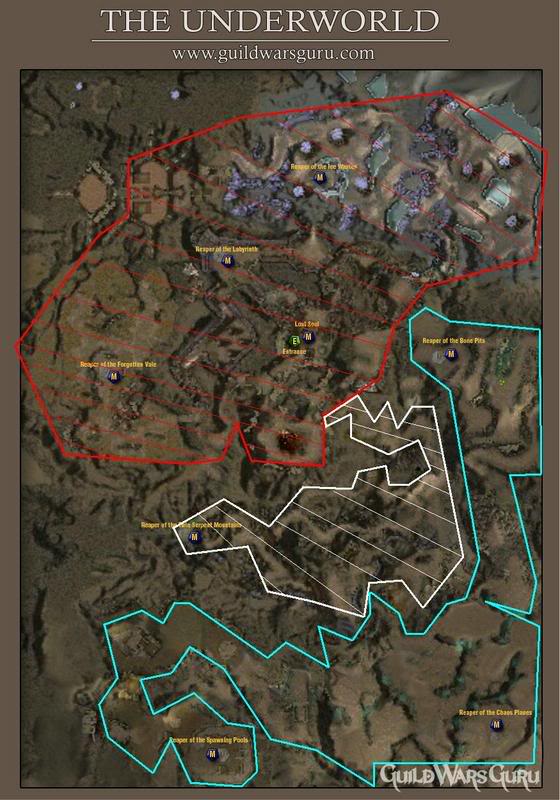 Legend: Red Area: Farmed and Explored easily White Area : White area Farmed slowly, Explored easily Cyan Area : Cannot be Farmed , can be Explored slightly As you see the Underworld can be summed up by 7 parts as in Grenth Statue locations. You have access to 4 of these. This map will update once we make some parts more accessible or expand our borders in farming in any way. For Contact: Sapphire Ice is the game handle for my companion in Guild Wars. You can whisper him. You can e-mail me via my adress on this forum.  Enjoy. Last edited by Kryth; Jan 07, 2007 at 02:06 PM // 14:06.. |

|

|
 Nov 30, 2006, 04:33 PM // 16:33
|
#2 |
|
Lion's Arch Merchant
Join Date: Apr 2006
Location: Belgium
|
woot cant wait to try this out !

|

|

|
 Nov 30, 2006, 04:50 PM // 16:50
|
#3 |
|
Pre-Searing Cadet
Join Date: Nov 2005
Guild: Llama Warlords of Subspace
Profession: Me/E
|
Great guide, very detailed. I'll definitely try this out.
One suggestion/idea: Instead of using a Mo/Me for the 2nd person, what about using a Me/Mo with Signet of Illusions. 1-Essence Bond 2-Signet of Illusions {E} 3-Mending 4-Healing Breeze 5-Ancestor's Visage 6-Sympathetic Visage 7-Vengeance 8-Rebirth Put 16 into Illusion magic and besure to use the Signet of Illusions before casting the Monk Enchants. You could even use a +1 Illusion Wand and +1 Illusion Off Hand to get the Mending up to a +5 mending. Might be a pain to get the lvl 18 cast but it would free up all the rest of your Attribute points to be put elsewhere. Also, at lvl 16 your Healing Breeze will do +9hp regen and if you get a lvl 17 cast it would be +10hp regen. Using the mesmer might free up some attribute points so that you could maybe bring some more offense. Or you could even cast the Prot Spirit on the tank using a lvl 16 cast. Just some ideas..... Kudos on the build though. I really like the idea. Especially the Resurrects. Very creative. ZoA |

|

|
 Nov 30, 2006, 05:28 PM // 17:28
|
#4 |
|
Ascalonian Squire
Join Date: Nov 2006
Location: Istanbul
Profession: E/
|
Well, your suggestion is a good one, should try it, but our main purpose was to make this build available to nearly all players, like who have only prophecies. in fact we're working on a new 2nd build and we might try your suggestion.
Still people might think it's a little slow, and monking in this build is super boring. well, lemme say, it's not that SUPER boring. As long as you have some vodka, or enough stuff to smoke, time passes by.  hehehe. Just W/mo needs to ping the map from time to time, to get your attention back, since the monk nearly does nothing. :P great for lazy players! hehehe. Just W/mo needs to ping the map from time to time, to get your attention back, since the monk nearly does nothing. :P great for lazy players! And yeah, thanks Kryth, we both know, if I didn't have enough vodka we wouldn't come up with this... PS for in game questions: I wouldn't be online for a while, modem sucks ass lately. |

|

|
 Nov 30, 2006, 06:33 PM // 18:33
|
#5 |
|
Ascalonian Squire
Join Date: Aug 2006
Guild: Namelessones
Profession: N/Me
|
Well done guide. Its nice seeing something for the warriors.
Question for you. I see that you have an average time of 45 minutes, which is not too bad (30 would be great), but have you been able to improve that time with experience? Just curious. Thx |

|

|
 Nov 30, 2006, 07:27 PM // 19:27
|
#6 |
|
Academy Page
Join Date: Aug 2006
Location: The Netherlands
Profession: Mo/
|
Great guide, my Monk is looking forward to helping a Warrior in UW anytime soon

|

|

|
 Nov 30, 2006, 08:30 PM // 20:30
|
#7 |
|
Wilds Pathfinder
Join Date: Oct 2006
Location: South Africa
Profession: N/
|
Looks good. I am a UW noob however. My stupid question for the day is wouldnt it be better to have a two man team like you have but swop out the Warrior for a 55 mesmer with IW? Sorry if Im missing something obvious.
|

|

|
 Nov 30, 2006, 08:52 PM // 20:52
|
#8 |
|
Ascalonian Squire
Join Date: Jun 2006
Guild: Mutants [MU]
|
Nice guide, pretty comprehensive.
fyi...You can use Resurection Chant to rez a 55  ^_^ |

|

|
 Nov 30, 2006, 10:20 PM // 22:20
|
#9 |
|
Krytan Explorer
Join Date: Apr 2006
Location: New Jersey
Profession: Mo/
|
Why does everyone ignore eles? Honestly, your making things way to complicated by taking a warrior.
Sliver Armor: For 11 seconds, you have a 45? percent chance to "block" attacks and whenever you are the target of an enemy attack or skill, one nearby foe takings 37 damage. Combined with protective spirit, SFA, OF or GoR, you can aggro the entire aatxe chamber and kill them in about 3 minutes. Of course you would still need the monk bonder, that or a QZ/SQ ranger. |

|

|
 Nov 30, 2006, 10:44 PM // 22:44
|
#10 | |
|
Banned
Join Date: Jan 2006
Location: Ohio
|
Quote:
|
|

|

|
 Nov 30, 2006, 10:48 PM // 22:48
|
#11 |
|
Frost Gate Guardian
Join Date: Nov 2006
Location: Ascalon
Guild: Venatori Solaris
|
@ ZoAnimus : Very diverse and creative idea. You should try it. We tried to keep the build accessible to everyone by bringing the skills from the Prophecies campaign.
 @ Zipster : It's 45-60 with experience because you kill Coldfires too. If you don't chat at all with your partner you can improve your pace. Vent or TS will also do.  @ random.name : IW Mes' damage output is as nowhere close to the Warrior of this build. We have analyzed that too  @ Keo Sabriel : ye now we are doing that  Saves more time. Saves more time. @ Why Me : I didn't mean to ignore the elementalists. But Sliver Armor, by blocking enemy attacks, will decrease your energy income. Could u elaborate more on your idea so maybe we can come up with something that works. Btw I usually don't post things like these but this happened a few hours ago while we were farming and we were like WTF =O Last edited by Kryth; Nov 30, 2006 at 11:02 PM // 23:02.. |

|

|
 Nov 30, 2006, 10:59 PM // 22:59
|
#12 |
|
Krytan Explorer
Join Date: Apr 2006
Location: New Jersey
Profession: Mo/
|
The energy doesn't hurt, you have more than enough.
Example build that works amazing. Glyph o Renewal Protective Spirit Essense Bond Balts Spirit Sliver Armor Stoneflesh Aura Stoning to kill nightmares? I dunno Rebirth? o wait, now the only skills your bonder needs is Visages... |

|

|
 Nov 30, 2006, 11:24 PM // 23:24
|
#13 |
|
Ascalonian Squire
Join Date: Nov 2006
Location: Istanbul
Profession: E/
|
@ Why_Me : I'm originally E/ . Kryth and I used to go in with my Ele and his Ranger. Alas, Ele was only tanking, and sometimes dealing area dmg (eruption on behemots for blinding, or AS for fast Smiter kill.) But the dmg I'm dealing was only for fun.
And instead of that build of yours ele can go in as Immune to magic, with unlimited obsidian flesh. (max earth + %20 long ench) Still a tank though. Energy wouldn't be a problem you said, yeah I agree. It won't. But since ele players are easy going with their energies, it depletes too fast, you don't even know it. And rather than energey dependand class, we prefered W. thanks to balthazars spirit. And finally, if you say it works; Go with your own build  We might work on an ele frontier with Mo/Me support. but naah, I'll pass. |

|

|
 Dec 03, 2006, 12:15 AM // 00:15
|
#14 |
|
Academy Page
Join Date: Mar 2006
Guild: All The Ectos Are [GoNe]
Profession: N/Mo
|
Thank you so much for this build.
 I just tried a duo run last night with the standard SS/55 team and the smites were our destruction. D; I hate Anet updates. But I already have my warrior setup for this build and I will definitely be trying it out soon.  If any monk wants to team up with me just whisper me on GW when we have favor. My Warrior's named is "Slayer of Shades" |

|

|
 Dec 03, 2006, 07:00 AM // 07:00
|
#15 |
|
Ascalonian Squire
Join Date: Nov 2006
Guild: Death's Will [DW]
Profession: W/Mo
|
nice build
will give a try later on today (finally prepared my warrior for this) and saph... be there!!! |

|

|
 Dec 03, 2006, 12:20 PM // 12:20
|
#16 |
|
Lion's Arch Merchant
Join Date: Sep 2006
Profession: Mo/
|
*cought* judje's insight *cought*
u also can replace the skils to regen for vigorous spirit!! Last edited by ACreator; Dec 03, 2006 at 12:46 PM // 12:46.. |

|

|
 Dec 03, 2006, 02:52 PM // 14:52
|
#17 |
|
Ascalonian Squire
Join Date: Nov 2006
Guild: Death's Will [DW]
Profession: W/Mo
|
myeah could do that, but thats overhealing, the duration would be nice tho (30secs +20%)
|

|

|
 Dec 03, 2006, 03:44 PM // 15:44
|
#18 |
|
Frost Gate Guardian
Join Date: Nov 2006
Location: Ascalon
Guild: Venatori Solaris
|
Good point ACreator. We've spent some good time thinkin on it too. There is lots to elaborate on Judge's Insight. First of all, Smiters are undead to my knowledge. 400 DPS anyone?
 Sounds a little farfetched I know, but for the ones who tried this build they'll know smiters are the most entertaining part of the whole run. (due to damage of course Sounds a little farfetched I know, but for the ones who tried this build they'll know smiters are the most entertaining part of the whole run. (due to damage of course  ) And now that the warrior uses double penetrating strikes, he gets a lot of damage (AP) bonus from Judges in all cases. But what to drop for of Judges insight from the Monk skillbar? On top of that Monk has to ridirect attribute points to Smiting Prayers, which is ok. I mean Divine Favor could be reduced to 3 and all the points are added to Smiting Prayers , even with a Superior rune of Smiting Prayers. Monk should be out of harm's way anyway. But I ask again, what to drop for Judges? I'm sure it will drastically improve the speed of the whole run. But it shouldn't cost the overall reliability of the build if you know what I mean. ) And now that the warrior uses double penetrating strikes, he gets a lot of damage (AP) bonus from Judges in all cases. But what to drop for of Judges insight from the Monk skillbar? On top of that Monk has to ridirect attribute points to Smiting Prayers, which is ok. I mean Divine Favor could be reduced to 3 and all the points are added to Smiting Prayers , even with a Superior rune of Smiting Prayers. Monk should be out of harm's way anyway. But I ask again, what to drop for Judges? I'm sure it will drastically improve the speed of the whole run. But it shouldn't cost the overall reliability of the build if you know what I mean. There is one possible solution I can think of right now. Drop Watchful Spirit for Judge's but the Monk must permanently keep Healing Breeze on Warrior under that condition. I wanna hear some opinions on this one cuz I know it'll help speed up the build quite effectively. |

|

|
 Dec 03, 2006, 04:10 PM // 16:10
|
#19 |
|
Ascalonian Squire
Join Date: Nov 2006
Guild: Death's Will [DW]
Profession: W/Mo
|
why change the monk attributes when warrior already have smiting prayers attributes?
 ill replace dismember with judges insight (i dont have faction or nightfall), i think it could work if the warrior has a perfect enchanting upgrade (like i have  ) )
Last edited by Madical; Dec 03, 2006 at 04:31 PM // 16:31.. |

|

|
 Dec 03, 2006, 04:24 PM // 16:24
|
#20 |
|
Krytan Explorer
Join Date: Jul 2005
Location: Dallas, TX
Guild: The International Terrorists [USA]
Profession: W/Mo
|
Great build man, I need to get into contact with some friends and try it out.
Question: I don't own Factions so Penetrating CHOP is unavailable for me, do you have any NF or Prophecies replacement suggestions? |

|

|
 |
|
«
Previous Thread
|
Next Thread
»
| Thread Tools | |
| Display Modes | |
|
|
All times are GMT. The time now is 08:39 AM // 08:39.


 Linear Mode


